How to fix it :
The most common fault with the PSX is skipping or not reading disks, this
problem gets worse as the machine gets warm. This occurs when the laser optics can't track
or read the data on the disk. The problem is more apparent with golds (copied ) disks as
these can never reflect the laser back as efficiently as an original disk, this is because
CD writers cannot burn the pits that form the data on a CD-R disk as cleanly as you get
with a pressed disk. Most people would probably not notice this problem until they have
fitted a chip and tried using golds, this is not a problem with the chip but the same
problem I have just described originals should work the same with or without a chip
fitted.
The problem is more apparent in earlier versions of the Playstation, Sony took steps to
combat this problem in later revisions of the machine. The very first edition of the PSX
(SCPH 1000, 1001, 1002) that allowed you use swap tricks to play copies is the worst for
this problem. This used plastic parts in the laser (described later ) which become worn
after which the machine would struggle reading disks. The later versions of these machines
(SCPH 1000, 1001, 1002 ) came with a modified laser unit that used die cast alloy parts
which were much better wearing. The latest revision of the PSX the SCPH-550x series seems
to be laser problem free and no adjustments should be made even after fitting a chip, this
model does not have bias and gain adjustments..
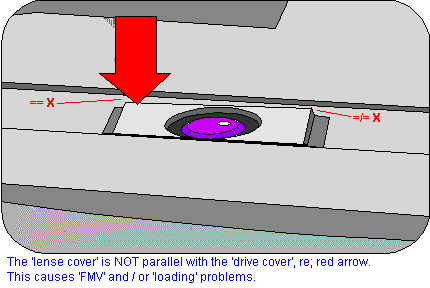
If you have an early PSX you can see on the following zoomed picture a PSX laser that has
a worn sled unit that needs repair, as you can see one side of the laser is sitting lower
than the other, this causes focusing problems which cause the skipping.
PSX Lense Servo Adjustment....
If your machine tends to play better when you turn it upside or on it's side then it is
a sure candidate for laser wear and adjustment.
The first thing you try is to adjust the bias and gain controls, on earlier machines this
will only provide a temporary cure as the plastic sled may be in need of repair.
Adjustment usually provides good results on the later machines that have the alloy sled.
These controls have the following effect....
BIAS : This control sets the default DC voltage flowing through the servo coils in the
laser that move the laser lens up and down, basically it sets the default distance between
the surface of the disk and the lens. This adjustment is the one that has most effect when
adjusting to cure problems.
GAIN : This control sets the voltage that is added or subtracted from the bias voltage by
the servo circuits for a given fluctuation. So when you have a slightly warped disk the
lens can bob up and down and follow the surface accurately, if this setting is not correct
the laser will not accurately track warped disks.
Adjusting the bias control slightly clockwise will increase the bias voltage and therefore
move the laser slightly closer to the disk, this is usually sufficient to cure the problem
for most machines. With an earlier machine that has a worn laser this may not cure the
problem, the laser will either have to be replaced or repaired/modified.
Setting the laser servo to its correct position...
If you have messed around and twiddled the bias and gain pots and your machine no
longer operates correctly you can try to set the controls up to there normal position by
using a digital multimeter. Connect the ground on your meter to the metal shielding and
the positive probe to the following test point near the laser connector.
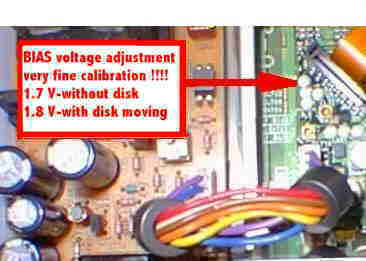
With the PSX switched on (beware of live parts in the power supply) and no disk I.E. door
switch up, set the voltage at this point to 1.70 volts, on a good laser this should the
correct voltage however if your laser is worn you might need to increase this slightly.
Once you have set the bias put a disk onto the spindle press the door switch (you may need
an assistant to do this) the voltage should rise to something like 0.15 volts higher than
with no disk (E.G. 1.85) if its to high or too low adjust the gain control till it is
somewhere between those values. Your PSX should now behave it self again.
Modifying the laser.
Modifying the laser is quite tricky so I suggest only real electronics engineers
attempt this. Basically the modification has to lift the side of the laser that has
dropped because of sled wear. The best way to achieve this is to disassemble the laser and
add a small piece of thin sheet metal between the sled parts... see the diagrams later.
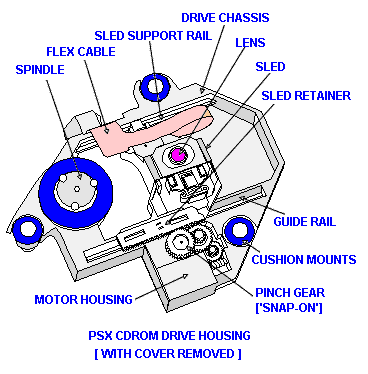
Only one principle is behind to making your PSX CD-ROM Drive work again, the sled that
carries the optics (lens) should be strictly level or parallel with the CD, and all you
need to do is devise something to make it level again.
Firstly disassemble your PSX And remove the laser as per the instructions for installing
the chip. Once you have removed the laser turn the worm gear on the underside to move the
lens into the mid position, otherwise the lens will get in the way of the cover if it is
left in its rest position when disassembling the laser.


To fix the problem we need to make the above sled perfectly horizontal again, the simplest
way to do this is to add a small piece (approx. 3mm by 5mm ) of sheet metal around 0.3mm
thick to the sled unit at the position shown in the diagram below. You can use the metal
cover from an old floppy disk and then cut it with a sharp pair of scissors. The piece can
be glued in place with a tiny amount of super glue.

While the glue sets re-lubricate the sled rails with some decent quality grease, white
lithium if possible silicon grease is also good. You can then reassemble your laser
assembly and set up the BIAS control again. Your machine should now work fine.
Kind Regards,"Michaeljohn Mercury".
Should you require assistance; email him at SydneyModchips@hotmail.com